Showing posts with label art. Show all posts

Thursday, May 10, 2012

For The Love Of Photography

Good day! I am so sorry I didn't post anything yesterday. I was out weeding and planting flowers all day, and I may have over done it a bit...just a tad (Stupid "Fibro").  

I know I said in my intro that I love photography, and I wanted to share with you some of my work.  After reviewing a ton of pictures, I realized that I love to photograph flowers and nature stuff. I also love to photograph people, but, something about outside stuff just intrigues me.

Believe me when I say I do not in any way consider myself a "professional", far from it in fact. But, I love to take pictures.  Just ask my computer hard drive. It got mad at me and forced me to move about 15K pictures...

Anyway, here is a look at some of my work...


See, I love taking pictures of flowers!


Black and White is also a favorite of mine. I think 2 things about it. 1. It hides flaws and 2. It brings out some of the best features. I loved the way the vintage fan turned out. Unfortunately the fan belongs to my mom... :(


Again with the flowers! Does it ever stop?? :)  The apple holder is my little one Zoe, and the hands in the bottom are mine and my husbands. Awwww, how sweet, right?


Let me say that in regards to the "Smoke Crack" picture, while I don't agree with the sentiment, I thought the picture turned out well. The phone booths were somewhere in London, I love the phone booths there.  Do we even have phone booths anymore here in the states??? The ehh hmmmm....beverage is a really good beer that I had in Greenwich England. I swear beer tastes better in Europe. And the apples were taken at Anderson Orchard during Zoe's first field trip.


As you might be able to tell, I like to shoot in cemeteries too. I know it's a bit macabre, 
but old headstones are fascinating. I am sure I don't have to point out what the first picture is, but I will anyway, Big Ben in London. That clock is MASSIVE. But it is absolutely breathtaking to stand directly underneath it. The beautiful little girl in orange is my daughter Zoe.


My nephew Alex when he was just a day old. What a cutie pie!


Zoe's favorite horse, Rose. She belongs to my cousins in Northern Indiana. She is such a sweetie.


So there you have it. A small glimpse into my ever expanding "portfolio".  If I couldn't take photographs, I think I might wilt away.  I swear one of my biggest fears is having my pictures or the external drive they are on, stolen. Ahhh, it chills me to even think about it!

Let me know what you think, and please feel free to share some of your own work! Like painting, or mixed media, or any other form of art, photography is a learning process. And the only opinion that matters is your own. (unless you are trying to get into National Geographic or something! )

Thanks so much for reading and following along. I appreciate it more than you know! 

**Please be sure to check back tomorrow, I will be honoring my Aunt who passed away May 12, 2011. She was an artist, business owner, philanthropist, fashionista and just a wonderful woman in general. Her life and death has had an immense impact on my life and so many others. I will try to honor her as best as I possibly can.**

Till Tomorrow, 


Thursday, May 3, 2012

Who Would Have Thunk It Could Work...

Good day readers! Today I am going to walk you through one of the easiest but most fun and kid friendly projects ever. 

**Note: You will start seeing the finished product first, before I go into the step-by-step, so you know what you are going to be looking at! Sorry for the previous tutorials where I didn't do this. But hey, it's a learning process, right?**

I found this project on Pinterest (LOVE that website) a few months back and I have been dying to try it. Finally, this blog gives me a reason to try out all these things I want to do!! You basically grab a canvas, a bottle of Elmer's Glue, and pencil and some paint. Simple. 

What I did next is totally optional, if you would rather free-hand just skip this step.  I drew out the basic picture I wanted to "glue draw" ,with a pencil. I liked doing this so I could see before applying the glue what it would look like.  
Once you have the basic layout, start drawing with glue!  Now, what I did find is that it is best to hold the tip of the bottle directly on the canvas if you want it to match your drawing lines perfectly.  I did not discover this until I was almost done, but I liked the way it turned out anyway, so I didn't bother starting over. 

This is what it looked like when I was done with the glue part of the project.  Now comes the waiting...and more waiting...and even more waiting.  The thicker the glue, the longer it will take to set. Finally after several hours of drying ( I may have over done it, but I wanted to make sure it was really dry. I didn't want the paint to smear the glue!), just start painting until your heart's content!  You could use one color, or you could do a mixture of several colors.  It all depends on the look you are going for.  For purposes of this tutorial, I painted it one color. 
And there you have it, the finished product.  I did learn a few lessons throughout the process. As I mentioned before, keep the tip of the glue bottle against the canvas as you "draw" with it.  I think the next time I do one of these, I am going to make the glue a little heavier to give it even more texture and 3-D appearance.

I hope you enjoy trying this as much as I did.  Please feel free to post your own work, or shoot me an email with questions! Comments are always appreciated so please leave me one!

Until tomorrow, have a great evening!


Thursday, April 26, 2012

The First Tutorial! - Washi Tape

Hope everyone is having a wonderful week so far, thank goodness it's almost over! Then comes a weekend full of tee-ball (Zoe) and Soccer (Iris) games!  

Today I decided to try out my tutorial skills. Bear with me here while I get my feet wet.  I've visited a lot of blogs that have tutorials on them and they can vary from completely vague to overly detailed...I would like to be somewhere in between.  I mean, I don't want to make you think I think you are an idiot now do I? NO!  But, at the same time, I also don't want to leave you in the dark and wonder "How did she get to that point?".  I also didn't want to start off with some crazy hard project. Mainly because my kids are insane and I don't have the time! :)  So, I figure Washi Tape is a good starting point. It's so easy to make and so versatile, I just wish I would have found out earlier!!

So....here we go! I'm going to show you how I am using my homemade Washi Tape to embellish my blog's "calling card".

Step one is to find a good double sided tape. I found that Scotch 3m Scrapbooking Tape is a really good one.
After you have found a good, strong tape, the next step is the best step! Finding the paper or fabric you want to apply. 

 
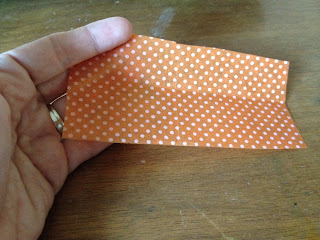
With so many patterns out there, the possibilities are endless.  I chose a piece of polka dotted tissue paper. I really like the tissue because it is lightweight, and still appears somewhat transparent once applied to the tape. But, for added texture, fabric or even scrapbooking paper would work well too.

Once you have completed the daunting task of choosing the pattern you want, (Oh the injustice of so many pretty choices, right?) and cutting it to size, you carefully apply the tape sticky side down (duh!).  Make sure you get a good hold on the paper, and that there are no air bubbles or buckling.  You can either do this with your fingertip, or use a brayer if you have one. 


Once you have the tape secured to the paper, simply trim around it with scissors.  Depending on the width of the tape you use, you could even use specialty scissors to create a patterned edge for an extra flair! (I love it when a good idea comes to me spontaneously. Note to self: Invest in pretty scissors!!)


Now, you have your very own, homemade Washi Tape! Like I said earlier I am using mine to embellish my cards.  Since I already had them printed, I just needed to peel and stick and voila! 


 A much prettier and much more unique calling card! Just make sure when peeling the paper off of the other side of the tape, you don't accidentally "kink" it. I did this and although I was able to "un-kink" it, I found it left a little crease. This was probably because I used a thin tissue. 

The possibilities are, literally, endless. Embellish a candle holder, envelopes, stationary, picture frames...I could go on and on and on and....well, you get the idea. Endless. Possibilities. Period.

I hope this little beginning tutorial was helpful and inspiring. Ive seen Washi Tape on Etsy and other craft sites and the prices are crazy! I think I paid $5.00 for the roll of tape, and the tissue was from a box of old scraps I bought at the Goodwill Outlet last year. Way more cost effective, and I can say that I made it. 

I would love to see what you have come up with, or other ways of making Washi Tape. Post a comment, or shoot me an email with your own ideas! Let's get creative! 

Monday, April 23, 2012

A Peek Into The Past


So, since my first post was an introduction about me and I mentioned that I was an artist, I figured I better make good on that claim! I took art all through high school, so I spent most of those four years doing art projects that I really wasn't interested in.  Figure drawing, pottery and such just are not my thing. I don't like being told what direction I have to go in either! So, as an adult, I have played with many different styles and forms and found that mixed media is a favorite of mine.  I also like to make jewelry and other accessories. I get a lot of my materials from the oddest places. "Found Objects" you might say.  I love, love, love The Goodwill Outlet. If you don't have one in your area, start a protest! It has to be the greatest store ever. You basically rummage through massive bins of the "unwanted" donations that the stores don't take. Boy, they have no idea what they are missing out on!!! I have found some great vintage papers, fabrics, books, etc...and pay next to nothing for it because you pay for it by the pound! Anyway, enough of a plug for the Goodwill... :) I also acquired a lot of objects for my art from various family members, friends and so on.  Here is just a small sampling (i.e. I cant seem to locate all of my pictures, grrrrrrr), of some of the pieces I have worked on. As I, ehem..., locate more pictures of my work I will be sure to share. And please, if you see something you like and want to try it out for yourself but don't know where to begin, let me know! I am always glad to pass on any "industry secrets". But truthfully, I work by trial and error, and more error, and more error....and, well you get the picture. Art is always a work in progress!!


This piece was actually one of my famous "Trial and Error" projects, I liked the way it turned out so much, i ditched all the others and framed this one...NOT what the intended finished project was supposed to be though.


A broken and mismatched earring turned awesome (and heavy) ring


I actually made this for my daughter whose name is Iris. I printed an image of an Iris onto an old dictionary (it was in bad shape anyway, and then I hand colored. 
Mixed Media piece made with a vintage photograph, vintage buttons, vintage newspaper and then hand cut bits for the wings, legs and body...added a bit of sparkle with some glitter and aged the paper with ink.

So, as you can see, I am a jack of all trades and a master of absolutely NONE. But, I am good with that. Its fun to create and see what you can come up with. Sometimes I surprise myself even! Again, if you ever see anything you like that I post, please let me know and I can always post a tutorial! Hope everyone has a great week...until tomorrow...


Friday, April 20, 2012

Here We Go!!


Welcome, welcome, welcome! So, this is my first official blog entry. I am so excited to be finally posting this!

Now, I did a lot of research to make sure I got this thing running in the best possible manner. I poured over countless other blogs and websites. My biggest hang up was “How do I possibly introduce myself to the whole entire world??”. After a ton of stressing and procrastinating, I finally just decided to just wing it. So, without further ado, I'd like to introduce...ME!

My name is Sascha, pronounced SASH-UH. Believe me, that's the easiest way to explain it. Born and raised in the Midwest, I am lucky to have a good appreciation for both the big city and the country alike. I am Thirty-blah blah blah years old (Not giving away just everything!) and I am married with two little girls (divas), Iris and Zoe. I have been married now (2nd time around, ack) for almost five years. I am a stay at home/ work at home mom and I wouldn’t have that any other way. I have worked in Real Estate for about 13 years now, in some form or fashion. And while I really love it, I am soooooo tired of working for “The Man”. My passions in life are my family, arts and crafts, photography and reading my beloved books. I am a total bookworm that only just blossomed in my adulthood. Before age twenty-five, you couldn’t get me to touch a book let alone read one! I love my crazy life, even if there aren’t enough hours in the day to get it all done. I absolutely detest laundry and I would swear that dust bunnies across the globe have come together (in my house) just to irritate me. I love to tell stories, I am all hands, crazy facial expressions and really bad voice impressions. My mom always tells me I should have been a stand up comedian, but somehow I just don’t think anyone else would appreciate my animated story telling like they do. 

Now, what exactly do I plan on doing with this blog? Well, my intentions are to share, inspire and relate to others. I have a mind full of projects (along with a studio of half-finished ones) that I would love to share with others! I plan on posting tutorials, along with pictures, of current and past projects I have done. I find so much inspiration from other peoples work, and now I want to pay that forward and be the inspiration for others.

As I said earlier, I’m a mother to two little girls. They are my entire world. I would not be who I am now without them. They drive me absolutely insane, but I love them to absolute pieces. Having said that, sometimes they completely hinder my much needed arts and crafts time! I usually find myself creating at the most odd times of the day.  I get sooooooo frustrated when I have this “brilliant” idea in my head and have to end up waiting til 3am, when insomnia takes over, to actually do something! So, my second intention is to show others that it IS manageable. You can be a great mom and a great artist all at once. You just have to be...creative. :)

Something I didn’t mention in my initial intro, that I plan on blogging about, is my “Fibromyalgia”. I put that in quotations for the simple fact that the issue of whether Fibro is a “real” condition seems to be a hot topic, and unfortunately it feels like there is a stigma attached to the diagnosis. And let me tell you , that sucks. I hurt ALL THE TIME. I have had every possible test run to rule out nerve issues, bone fractures, Thyroid issues...you name it, I've done it. I am a close personal friend of all x-ray, CT and MRI machines within a 20 mile radius...trust me. I will go into the specifics in a later post because I have officially, as of just this moment, made Fridays here “Fibro Fridays”! In all sincerity though, it is an issue that is near and dear to me because it has changed my life in so many ways it's crazy. Along with being a mother and an artist, I am also able to be a chronic pain sufferer and an artist...again it just takes some creativity.

So, that is me...for now...I am really excited to begin this journey and I truly hope you will join me! Its sure to be a lot of fun and hopefully even more helpful to others that might find themselves experiencing some of the same “life's little quirks" like myself. Please feel free to leave me comments or send me an email to feisty.blatherings@gmail.com. It can be something good or constructively critical, I appreciate a bit of everything. And be sure to check back often as I am determined to make this the one blog you will be sure to come back to!

Enjoy!