
Good day readers! Today I am going to walk you through one of the easiest but most fun and kid friendly projects ever.

**Note: You will start seeing the finished product first, before I go into the step-by-step, so you know what you are going to be looking at! Sorry for the previous tutorials where I didn't do this. But hey, it's a learning process, right?**
I found this project on Pinterest (LOVE that website) a few months back and I have been dying to try it. Finally, this blog gives me a reason to try out all these things I want to do!! You basically grab a canvas, a bottle of Elmer's Glue, and pencil and some paint. Simple.

What I did next is totally optional, if you would rather free-hand just skip this step. I drew out the basic picture I wanted to "glue draw" ,with a pencil. I liked doing this so I could see before applying the glue what it would look like.

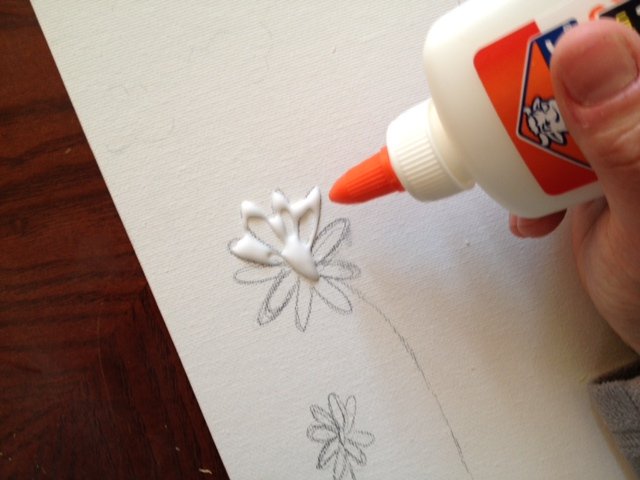
Once you have the basic layout, start drawing with glue! Now, what I did find is that it is best to hold the tip of the bottle directly on the canvas if you want it to match your drawing lines perfectly. I did not discover this until I was almost done, but I liked the way it turned out anyway, so I didn't bother starting over.

This is what it looked like when I was done with the glue part of the project. Now comes the waiting...and more waiting...and even more waiting. The thicker the glue, the longer it will take to set. Finally after several hours of drying ( I may have over done it, but I wanted to make sure it was really dry. I didn't want the paint to smear the glue!), just start painting until your heart's content! You could use one color, or you could do a mixture of several colors. It all depends on the look you are going for. For purposes of this tutorial, I painted it one color.


And there you have it, the finished product. I did learn a few lessons throughout the process. As I mentioned before, keep the tip of the glue bottle against the canvas as you "draw" with it. I think the next time I do one of these, I am going to make the glue a little heavier to give it even more texture and 3-D appearance.
I hope you enjoy trying this as much as I did. Please feel free to post your own work, or shoot me an email with questions! Comments are always appreciated so please leave me one!
Until tomorrow, have a great evening!

That is really pretty! I like how easy it was to do, and it looks super modern. Great job!
ReplyDeletelooks great, and simple to do !!!
ReplyDeletePaula
It`s very interesting kind of painting, I have to try:):):)
ReplyDeleteSonja
thanks :P))) amazing idea! cheap, easy and looks great
ReplyDeleteThanks for the comments everyone! This was a really fun project to do. The waiting for the drying was the hardest part! (I am notoriously impatient). If you have tried this, send pics and I will be more than happy to post here and share with others!
ReplyDelete